

In light of the recent controversy over excessive logging, today’s buyers are demanding homes that won’t harm them over time. This means that builders who want to build their homes watertight and energy efficient must be extremely careful about the products and materials they use.
Is it the problem with energy-efficient construction: Can well-sealed buildings accumulate toxic chemicals, mold, pollen, and other irritants?
The first thing that builders must be aware of is that they must ask the manufacturers (material data sheets).
The request for transparency regarding the composition of the materials used can have the greatest impact on the health of homes.
As more manufacturers voluntarily disclose what their products contain, their competitors will have to follow suit.
There are programs like the “Declare label” offered by the International Living Future Institute, which offer manufacturers inexpensive ways to certify their products through a third-party label, and more.
In the field of residential buildings, some housing developers apply quality control through performance, health and building development tests to ensure that all projects are third-party certified to programs such as LEED, nZEB and Passive House.
While these certifications ensure that the products being used are made for a higher level of health, specifying the right materials is only one step in the game plan to ensure good indoor air quality.
It takes a wide range of science-based strategies—from ventilation and moisture control to radon mitigation and conscientious building practices—to ensure a healthy home. Here is our checklist:
1.Have an indoor air quality test certified by a third-party laboratory. Indoor air quality testing using a professional third-party lab will give you a performance value to compare and improve your build.
Consider testing for formaldehyde, tVOC, particulate matter and mold.
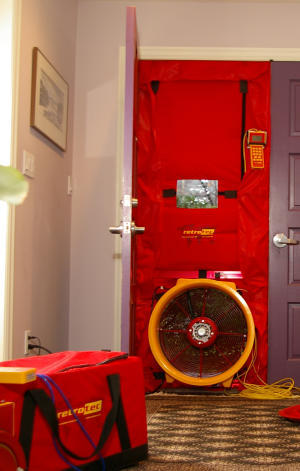
2. Keep air changes to a minimum. Make sure, the house is built to perform less than 1.5 ACH @ 50 Pascal. (calculation of air changes per hour).
We like to build to passive house standards of 6 AHC @ 50, but 1.5 is a good goal if you’re just starting to measure this value. Tight insulation prevents dust, insects and airborne particles from entering the dark, narrow corners of most homes.
3. Ensure balanced ventilation with heat recovery and distribution. Installing a heat recovery ventilation system is essential for superior comfort and air quality. This makes sure that there is no pressure imbalance in the house.
If your ventilation system is distributed throughout the house, it will ensure that fresh air reaches all the locations you want, such as above your beds.
4.Make sure the walls are modeled using tool like “WUFI” or similar programs to ensure adequate drying potential. WUFI is a hydrothermal modeling tool that models the exact building assembly with all layers until it reaches your exact climate.
It runs a multi-year model that shows if there is a risk of condensation in your wall and assesses the potential for mold growth.
Condensation in your wall is moisture, and moisture leads to building damage.
5.Install carbon monoxide detectors on every floor and within 50 feet of all bedrooms.
An odorless and deadly gas like carbon monoxide is obviously important to monitor in the home, and properly installing detectors will ensure that there is never a dangerous level.
6.Install a radon fan under the floor that opens through the roof. A passive fan installed through the roof is cheap and easy to install.
Taking it a step further, you can also install an exhaust fan in a junction box near the ductwork in the attic, in case a homeowner needs or wants to add an active radon mitigation system.
7.Works to eliminate condensation, which can lead to mold growth. One-third of the house’s R-value must be installed outside the vapor barrier to ensure elimination of all condensation surfaces in the wall assembly.
This is a good rule of thumb for colder areas and WUFI is a great tool to check if the system is working properly.
The outer insulation will warm the outer jacket so that the inner face of the liner does not become a condensation surface.
8.Take photos of all wall cavities before insulation. Transparency is essential to maintain customer trust, knowing that you are guaranteeing the quality of the product.
I always shake my head when I remodel a house and find trash and sawdust inside the wall cavities, which guarantees dirty and dusty houses.
Taking these pictures reinforces the fact that you take pride in the cleanliness of the home you built and also gives the customer the exact locations of all mechanical systems as well as studs.
This information is key to future remodeling.
9. Carefully check the exterior penetrations at the windows and roof to help detect and eliminate possible accumulated water.
Unfortunately, homeowners have become accustomed to leaking windows and roofs that need to be repaired or replaced. If outside water finds its way into your home, it cannot be considered a healthy home.
Source: http://www.ecobuildingpulse.com